Installation
proxymock does some pretty heavy duty work all from the command line. Using the cli, you can automate the creation of simulation environments, record new traffic, modify transactions and replay.
Install with your coding agent (recommended)
Let your coding agent (Claude Code, Cursor, Codex, Gemini CLI, Kiro, or any assistant that can read a URL and run commands) install proxymock for you. Paste this into the chat:
Install proxymock for me on this machine. First fetch the agent skill at
https://raw.githubusercontent.com/speedscale/skills/main/skills/install-speedscale/SKILL.md
and the references/ and scripts/ files it links to (same base URL), save them
under your skills directory, then follow the skill in local mode: proxymock and
its MCP server only, no Kubernetes operator.
The install-speedscale skill installs proxymock for your OS and walks you through proxymock init. Your recordings stay on your machine. It also connects the proxymock MCP server to your agent, so you can ask it to record, mock, and replay traffic. The agent stops for you at browser sign-in and asks before it changes anything outside your machine.
See Agent skills for the other skills.
Install proxymock manually
Prefer to install it yourself? Pick your OS:
- macOS
- Linux
- Windows
- Binary
Install with Homebrew:
brew install speedscale/tap/proxymock
You can also manually run the install script (don't do this if your ran brew install):
sh -c "$(curl -Lfs https://downloads.speedscale.com/proxymock/install-proxymock)"
Optionally, install a specific version by passing it to the install script:
sh -c "$(curl -Lfs https://downloads.speedscale.com/proxymock/install-proxymock)" -s v2.3.456
Run the install script:
sh -c "$(curl -Lfs https://downloads.speedscale.com/proxymock/install-proxymock)"
Optionally, install a specific version by passing it to the install script:
sh -c "$(curl -Lfs https://downloads.speedscale.com/proxymock/install-proxymock)" -s v2.3.456
After installing, confirm the CLI is available:
proxymock version
If you see command not found, proxymock was installed to $HOME/.speedscale but that directory is not yet on your PATH. Add it to the current shell:
export PATH="$PATH:$HOME/.speedscale"
To make it permanent, add that line to your shell profile (for example ~/.bashrc or ~/.zshrc).
proxymock.exe is capable of running all standard features natively on a Windows machine. Alternatively, you may use the linux proxymock binary via WSL.
Open PowerShell and create a Speedscale directory:
mkdir -f $env:userprofile\.speedscale
Download proxymock into the Speedscale directory:
curl.exe -L "https://downloads.speedscale.com/proxymock/proxymock.exe" -o $env:userprofile\.speedscale\proxymock.exe
If this is your first time using proxymock you may need to add the Speedscale directory to your Path environment variable so it is accessible without knowing the full path.
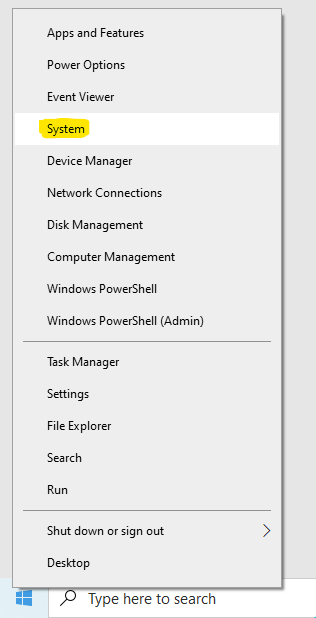
To add the Speedscale directory to your path, right click on the Windows button and click System.
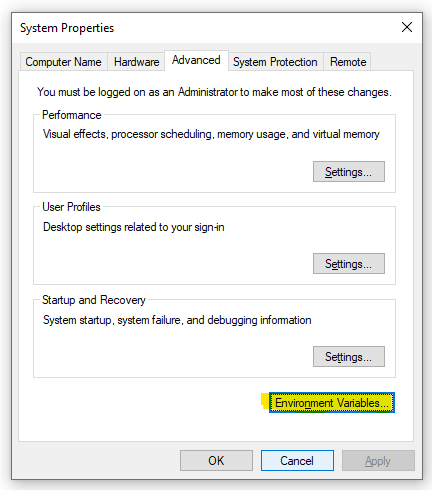
Click Advanced system settings on the right.

Click Environment Variables.
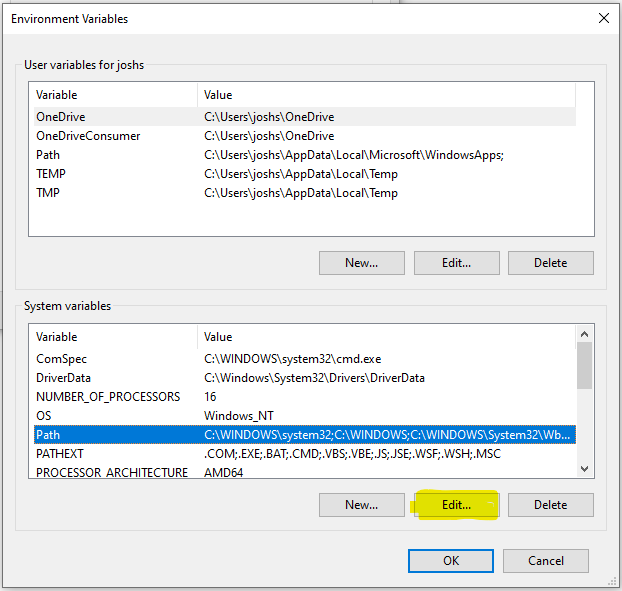
Under System variables select Path and click Edit.
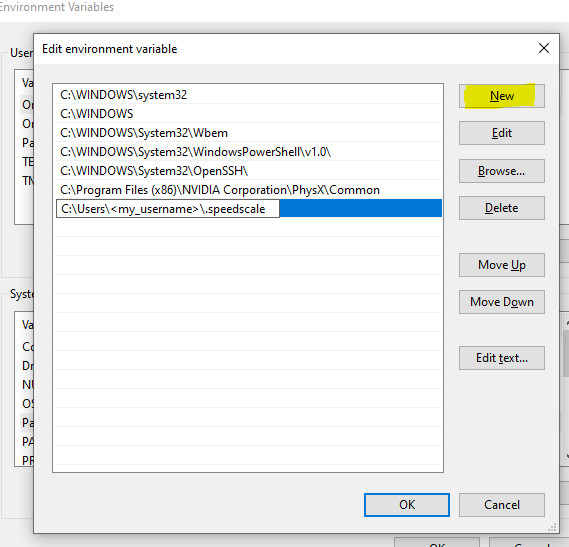
Create a New entry in the list with the Speedscale directory. If you are unsure of the exact path run this command from PowerShell.
echo $env:userprofile\.speedscale
Click OK and restart PowerShell.
Some of us are control freaks, or just hackers who like to mess with all of the knobs and switches. You can download the proxymock binary directly if that's your jam.
- MacOS
- Linux
- Windows
curl "https://downloads.speedscale.com/proxymock/proxymock-darwin-$(case $(uname -m) in x86_64) echo 'amd64';; arm | arm64 | aarch64) echo 'arm64';; esac)" -o proxymock
curl "https://downloads.speedscale.com/proxymock/proxymock-linux-$(case $(uname -m) in x86_64) echo 'amd64';; arm | arm64 | aarch64) echo 'arm64';; esac)" -o proxymock
proxymock.exe is capable of running all standard features natively on a Windows machine. Alternatively, you may use the linux proxymock binary via WSL.
curl.exe -L "https://downloads.speedscale.com/proxymock/proxymock.exe" -o $env:userprofile\.speedscale\proxymock.exe
Additional tasks associated usually assocated with standalone binaries, like permissions and $PATH, are up to you. If you're here we assume you know what you're doing.
Install the proxymock MCP by running proxymock mcp install (--yes skips the per-client prompts). That command also drops the install-speedscale skill into Claude Code, so /install-speedscale can upgrade or repair everything later.
After installing
Initialize once before your first recording. This registers a valid email to activate proxymock and is required even for fully local use; your recorded traffic stays on your machine. Browser sign-in is the default path:
- Run
proxymock initand use the browser sign-in flow. - Use
proxymock init --api-key <your key>only for CI or other headless environments.
For more options (enterprise profile, CI, troubleshooting), see Initialize API Key. Then continue with the Quickstart or use a language-specific first-success path: